Thursday, June 28, 2012

The Bunting Bandwagon, I jumped on it...


I'm not sure I like bunting, but I thought I'd give it a try to use up some fabrics I've had leftover from other projects.
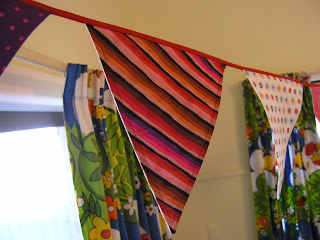
I made 8 meters of bias and I'm having trouble finding a way to string them up that looks good! And they clash with the curtains, bad. [The crazy curtains came with the house. Next stop: New curtains!] 

The best bunting template came from Chickabug Blog- and as for the best tutorial, I found the more I read, the more complicated it got. This is the simple method I ended up using.

10 Step Bunting


  1. Cut out two triangles from the same fabric. This works really well with a rotary cutter & mat, with the triangle template, as they articulate perfectly with each other at 45 degrees.
  2. Put the two sides of the triangle wrong sides together and sew down the long sides. Leave the short side open for turning out later.
  3. Clip the extra fabric at the point of the triangle close to the seam (to avoid bulk in the point once they're turned right-way out)
  4. Turn right sides out, gently poke the point out with a knitting needle or skewer, and press.
  5. Topstitch down long sides, 1/4 inch in from seam. 
  6. Put the flags in a pile in the order you want them to hang on the string.
  7. Get bias tape (preferably inch wide, not the 1/2 inch that I used, that was tricky!) and fold in half.
  8. Sew about 30-50cm of bias together in half, on the opposite side to the folded edge.
  9. Insert bunting flag into bias, leaving an inch or so between flags. 
  10. Sew as you go! Finish with another 30-50cm of straight bias without flags. (For tying)

There you go! I like the semi-circle version, and the half-doily versions too.

Wednesday, June 27, 2012

"Daddy's Little Girl" : Repurposed Denim Skirt

I've seen a few of these repurposed denim skirts kicking around online, so I thought I'd have a go myself. You can make at least 2 toddler skirts out of one pair of average sized mens jeans. 

Front of skirt. 

My daughter loves this skirt, because it's made out of Daddy's jeans. I kept the pockets from the original jeans as my daughter LOVES to collect rocks and all sorts outside, as well as collecting the eggs from the hens each day. The pockets are a real hit. 

Basic Instructions

Measure the length of skirt you want, and the waist size. Create a rectangle of denim pieces that is [waist size x length]. Inserting a box pleated section (like in the middle of back section here), or a wedge section (like the fly section in front of skirt) will create the flare in the skirt, without any gathering at the waist.

Waistband
Backside of skirt. 

You could easily make a denim waistband, but your sewing machine could have difficulty joining it all together, due to the thickness. Also, I tend to think that big denim waistbands might be a little uncomfortable for little ones, and unforgiving as they grow (and/or eat a big lunch!). I've used a folded piece of stretch knit here, but I've seen other people in the US use a cut up T-shirt. This doesn't work so well in Australia as our T-shirts have side seams, whereas the US make the body of their T-shirts out of essentially a 'tube' of stretch knit, perfect for repurposing.

I also decided not to waste the zip closure, inserting it into the elastic waistband makes for a much snugger fit, as you don't have to allow for getting the waistband over the hips. Much easier to get in and out of too, with a wriggly toddler!

And here it is on the little munchkin - a new fave. Just the right size for her little teddies!

I will be making another one out of the rest of the denim without the ginormous pockets, or zip fly. Just a 'plain' pleated denim attached to a knit waistband - more pics to follow!